I can blame the wood: hemlock is a soft wood. It crushes and chips instead of slicing nicely. I've also been using poplar, which is much nicer to work, and alder, which is my favorite of all but I do not have much more scrap material to work with.
I can blame my tools: try as I might, I am not sure my chisels are entirely flat and sharp. They look good, to me. They have a nice mirror-polish on the backs (8000 grit waterstones) and using essentially the same techniques to sharpen them as I do for plane irons. They act like razors when taken to paper or my armhair, and they pare nicely translucent very thin slices even on douglas fir. Maybe I need to sharpen them even more finely?
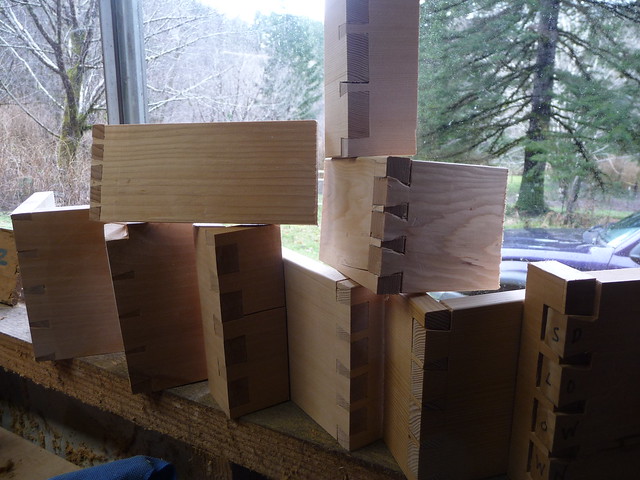
I mostly blame myself. Just not enough experience yet. I've cut 16 sample joints, and will not feel terrible about it until I've hit 30 or 40... However, I have reached a plateau of sorts and am out of ideas.
One of the main issues is that I can never get them to seat all the way, as can be seen by the red circles here:

It would seem there is some obstruction in the socket. However, on some of these joints I can actually see light all the way through, indicating that they are "pinched" into levitation by the side walls. Its probably a combination of all kinds of sloppiness adding up.
My tails (cut first) usually look pretty good. I can cut next to the line fairly well, and leave a rather smooth surface after cutting out the waste. I do all that I can to get the bottom of the socket plumb and smooth, without crossing the baseline. In the cases where I do cross the baseline, its understandable to have a gap, but I generally do not make this mistake (anymore) and am still baffled.
Marking seems to go ok, though it is never easy. Cutting the end grain is not easy, despite using a proper knife. Its impossible to tell if an effective cut was made until the whole process is complete (the cuts are not easily visible while the boards are in place). Making multiple passes on each cut introduces error so I try to do it right the first time. In general, they look good and seem to match the socket shapes.
Cutting to this line must be one of the biggest problems I have. Again, it looks fine after cutting. I am not obviously wandering from the line or skewing the saw. And again, the chisel work seems to go ok, but the end fit tells a different tale. I have been easing the backsides of the tails to make assembly easy (though it took me a while to actually wrap my head around which parts will not be visible).
My errors tend to be gaps, but at times I also have too tight of a fit, creating a split, such as outlined in red here:

When test-fitting, I have a hard time identifying which part is causing the problems, and my solutions to pare a little here and there, as Thomas does, generally makes matters worse.
I am confident that more practice will help, and I am nowhere near giving up. I am, however, temporarily out of ideas on what to consciously improve. All there is to do is just keep adding more joints to the pile and keep at it. I am actually only halfway through "dovetail month" and so was not expecting to be proficient yet. It is just a frustrating plateau, after some leaps and bounds of improvement in understanding, if not execution, my last 3 joints have not improved significantly.
Here's a pile of some of them:
This post is not a solicitation for advice, although I would gladly accept it if my issues are indicative of something specific. Its more just thinking out loud, logging my frustration, and an honest portrayal of the fact that woodworking is work. Like a cooking show, none of it is as simple as it looks. In fact, the more you know about it, the more you realize the difficulties. I also realize that these skills must be learned by doing. No amount of video-viewing and reading can transfer these skills beyond a shallow understanding. And so I persevere...
In brighter news, check out these awesome mini-rules from Josh Clark.
I am especially fond of the tiny 3" one... it opens to 12" and has a very useful caliper. I'll keep this one in my pocket for trips to the lumberyard for sure.

You know I honestly don't think those are bad at all. I think there is way to much pressure put on woodworkers to try and cut air-tight dovetails than need be. With the joints having a few gaps just proves it was done with hand tools and looks fine to me, in my opinon that's way more important than if they are just perfectly air-tight. Your doing great and unless you give up that's the only way to fail.
ReplyDeleteYou're going great! This good already and only half way through your dovetail month?
ReplyDeleteMy only suggestion would be to take your right angled pieces to the next stage and make boxes or trays instead - you get a usable artefact every couple of days!
Thanks for the replies. I agree that perfection is not strictly necessary, but as part of this project I am making objects for contributors, customers if you will... so I have some high standards. If I make a couple "airtight" joints, I will feel like I can then move on, and future imperfect joints will just be the way that it goes. I do plan to continue with the dovetail month and not start on the schoolboxes until it is complete... unless I start to consistently create great joints.
ReplyDeleteRob - I do like your idea and I might be approaching the level of "good enough" for simple shop trays and boxes. That will also start to teach me some of the assembly skills as well as needing to create 4 "good enough" corners at once.
I'm nowhere near giving up... in all honesty this post is more about the fact that I haven't had anything to post about for a while than it is about bad dovetails! I want my friends and followers to know what's going on in the shop, for better or for worse.
I really appreciate the reading and replies, thanks!
Those gaps look familiar to me. I'd say my dovetails have a similar problem after a fairly similar level of practice. It's particularly noticeable on wider boards, when my fairly tight joints make it hard to seat those tails in particular.
ReplyDeleteOne suggestion is to try glueing up some of your practice joints, if you haven't already. I know you wouldn't normally bother with test joints, but the results might be interesting. In particular, using hide glue should close the joint a little as it dries. I imagine that you're judging your unglued joints against what you have seen of other's glued joints.
I've tried the technique of clamping with specially cut cauls made to match the tail pattern. I know several experienced fine woodworkers who use this technique. It's a giant pain in the butt, and I can't imagine any traditional cabinetmaker doing it. Obviously Thomas didn't, but of course he was relying on the properties of hide glue as well.
If you did want to clamp, I'd recommend the Schwarz's technique of making the pins and tails slightly under length, rather than over length as needed for the above clamping technique. This allows you to clamp between flat clamping pads, and gives room for the joint to come together, the you need to plane the excess off each face. Since you're going to plane a finished joint anyway, it's not really a hassle.
I share your interest in getting a good tight joint, but also not fiddling around as a modern fine woodworker would, and taking years to do it. I look forward to seeing more of your endeavors, it should motivate me to practice a bit more too.
The high points don't have to be in a particular tail to hold it up. If you've got a high point on one end, it will "bridge" across the joint. A slight under-cut when paring from each direction would also leave the joint tight at the lip. Robert Wearing mentions this, I believe... but that's the wrong book.
ReplyDeleteI think if you focus on square paring to the line and accurate sawing, you can't help but to improve.
tsangell - it is the right book, in a way, as it is my main resource after Joiner Etc. I've tried a bit of undercutting, but I suspect I just don't have the coordination yet nor the sense of true flat/plumb/etc to build from. I suppose that what looks and feels flat and true to me just is not. Perhaps I need to check each socket with the square from now on? In fact, I am not sure why I have not been doing that yet... Maybe this was the lightbulb I needed to go on in my head?
ReplyDeleteI have this problem too. When you got to cut out the socket, dont rest the chisel right on the line. When you wack the chisel with the mallet you end up cutting past the line. Hope this helps. Kgoold
ReplyDeleteI was taught to use a 4" sliding square to check all the angles of my cuts. Before you transfer your marks either to your pin board or tail board make sure your "walls" are square and perfect in every way. You can also check the depth to make sure you are constant at your baseline.
ReplyDeleteIf the walls are not perfect, pare them until they are. If you do this before you transfer your lines to the other board, you are half way to perfect.
'Checking as you go' will limit the possibility of errors, and force you to see where you are going wrong and correct it.
Also, what are you using to make your lines with? I use an exacto knife because it is sharp, thin, and easy to work with. If you are using a bulky knife you might not be marking as perfectly as you should be. Don't cut on the line, cut on the waste side. You might be able to see the score marks from the knife left on your work. It is better to leave more meat on the joint, you can pare it away to get the fit you want.
And for the baseline, take a little bit off at a time to chew your way back. The final cut should be as small as possible. Let your chisel fall into the mark, then tap. If you are womping it, you are compressing the wood and pushing past your baseline. Also, try angleing the chise so the baseline is back-cut a few degrees. It is easier to back-cut in the beginning rather than trying to do it later.
I hope this helps.
Also, I don't see a baseline on your boards. The baseline marking should be on the outside because thats the side that has to be perfect. Actually, it should be on all sides of both boards if you are doing through dovetails
ReplyDeleteIf you dont have a good deep baseline, than you will never get a really good joint.
Get a nice marking gauge. Make sure it doesn't wiggle when its locked down, and make your marks constant and deep so your chisel falls into the line.
kgoold- That is good conventional wisdom but I have been taking the approach of Thomas and Rob Cosman to use the line as exactly as possible. Yes, the wedging action of the chisel will force a tiny bit of back-cutting, but you want the shoulder as accurate as possible.
ReplyDeleteJerseytool - very good suggestions. You are not seeing the baseline because they are planed off. I leave a nice deep one (with pencil line) using a Tite-Mark gauge:
http://www.flickr.com/photos/mantid/6798510891/
Your suggestion to use a square to check is a good once which I have been neglecting.
I use a Blue Spruce marking gauge, a pricy tool that was especially suggested for this chore... so I can't blame my tools. I am sure I will get this sooner or later, and I really appreciate the feedback and suggestions.
I struggled with this very same problem also. For me, undercutting the baseline on the pin board, and also not leaving too much wood on the walls (just enough to for it to keep pressure on itself) fixed mine.Also, as far as marking pins from tails, it was helpful for me to drop the knife and use a mechanical pencil, and I used the rabbet on the tail board as C. Schwarz does. Doing both of those fixed all of my marking problems. But that's just me, and I'm sure you've heard all that before anyway. Also, mine greatly improved as I built my tool chest with its some 100 tails. Love seein your progress too. Thanks for all the posts.
ReplyDelete