Thursday, December 29, 2011

Another Attempt

Today's joint came out better, but had a tragic flaw: one of the half-tails broke off during assembly.  A good lesson.

I used a coping saw to remove most of the socket waste this time.  Much faster, as expected.  I also carefully sharpened all of the bench chisels, which didn't seem to need it, but of course worked much better after this process.

I'll do at least one more using this same alder board (still getting a feel for its chippy nature) but then probably switch to some other types of wood.  This joint took less than half the time of the first one, and has a much tighter, though still flawed, fit.  Learning lots and having fun!


Sockets after clearing waste with the coping saw


The curved hump on the top is where the half-tail popped off.  In a real piece, it could be glued.

Tuesday, December 27, 2011

Slow n Dirty

One of the skill-builders I've been planning to do is based on a suggestion in the Anarchist's Tool Chest.  Its mentioned that making a joint a day for a month will provide much improvement.  Its one of those things that sounds simple, but after day one, I am definitely hoping it gets faster, if not easier.

I used a relatively thick piece of alder (3/4") because I thought that larger joint components would be easier to manage.  The "modern complication" of using a coping saw to remove the bulk of the socket waste was also forgone for the sake of simplicity.  This might have been a mistake, as the chiseling seemed to take a very long time.  I did not time this, but I believe this test joint took over 2 hours.

The end results are not great, but the joint did go together and is very, very strong without any glue.  I am confident I will improve and will do as many of these test joints as I can in coming weeks, if not actually 30 of them.

I've learned enough just today to have my head swimming with geometry, chisel methodology, and the kind of tired muscles (and eyes) that only come from a long day.  My shop lighting is turning out woefully inadequate for after-dark work.  Viewing the baseline was very difficult, and the harsh shadows which develop once the ambient sun goes away will not be tolerable in the long term.  Luckily we have very long days here in the spring and summer, and I have not been doing much at night this winter.  In the future, though, this will need to be addressed.

Here's a couple images from the sample joint:


This shows the tails cut but not yet chopped.


Now the tails are chopped out, so that the pins could be marked for cutting.


I chopped half of the sockets and then flipped the board to do the other side from the other direction, in order to avoid tearout.  This chisel work took much longer than the sawing, and possibly longer than the layout (which took a long time to wrap my head around).


And a completed joint.  The gaps are cringeworthy and yet the thing is very solid.  I did not glue it but it seems that it doesn't need it!  I will probably work with thinner hemlock stock now that I have a handle on the process and don't want to burn up too much of my alder to practice.

Learning the layout techniques took much longer than I had thought.  I am familiar with 4 or 5 methods, so had to choose one and roll with it.  I ended up using the system that Rob Cosman suggests.  I chose the width of the half pins, and then used dividers to space the tails (plus tail padding) between them.  Straightforward enough for me and I will stick with it until I have a better command of the sawing and chopping skills needed to make tight joints.

Much respect to those who already have dovetails mastered and make it look so trivial!

Monday, December 26, 2011

Night of 100 Cuts

Robert Wearing, Chris Schwarz, and, I believe, every other hand-tool woodworking author states simply and clearly that practice is essential, no matter how much one has observed, read, and studied.  While I have been pleased to see my handsaw skills generally up to my tasks so far, I take the above seriously and am willing to work for my self-improvement.  I like homework when I like the class.

I've read that 50 or 100 saw cuts will dramatically improve abilities, and 1000 should approach mastery.  It really wouldn't take long to get to these counts just by making things... but I want to jumpstart the process to make up for a few decades of not knowing how to use fine hand tools properly.

The Close Grain blog (one of my favorites for nicely detailed tutorials, by the way) has a great entry about this practice.  I did not make a dovetail marker as shown there, but otherwise modeled my assignment on the Night of 100 Cuts.

I am not doing a full write-up since its rather mundane and Steve eplains the whats and how-tos very well in the above link.  Instead, I just took a few photos and then stopped since I was busy with the sawing.  I also took a couple videos to see my own form but they are not nearly well-shot enough to share.

I did the series of 100 Steve recommends.  2 rounds each of 10 cuts (actually I was doing 12 or 13 for each style) set up in these 5 styles:
  • all faces square
  • edge skewed right 
  • edge skewed left
  • face skewed right
  • face skewed left
Cuts were all 3/4 deep in a 1/2" piece of hemlock.  This is the dovetail saw used:


It did indeed get easier over the course of the exercise; I started out pretty sketchy, especially regarding the rear baseline (I was not holding the saw level, but apparently sloped downhill away from me a bit).  


I took no more photos but did improve, and look forward to repeating this exercise frequently.  I will soon start to practice on actual dovetail joints (though not as part of a project), but I do want to have a Night of 100 Cuts at least monthly.  In a year that will be 1000 cuts, not counting any of them done in projects!


Saturday, December 24, 2011

Happy Holidays

Merry Holidays from my family to yours.


We live in a Douglas Fir forest, and so branches are plentiful.  No trees were permanently harmed in the creation of this display.

As an alternative, a borrowed image from a handy friend:


Whatever your flavor of winter celebration, I wish you the best, and happy 2012!

your apprentice,

Rob

Thursday, December 22, 2011

[Basics] Shooting End-grain

More than a couple people have asked me to slow down and explain what I am doing.  Lots of folks with very different backgrounds are reading along here, and its hard to make it readable for all.  To that end, entries detailing operations which might be old hat for seasoned woodworkers will be prefixed with [Basics] from now on.  Unless, of course, I forget.  Pros, feel free to correct/augment in the comments.  Civilians, feel free to ask for more clarification.

So without further ado, this is one way to square a board after cutting it close to length.  Explanations are under each image.  We start with a board that has been cut, but not to our exact length nor cut square enough for ready use.


This is the workbench set up to cut the board to length.  The board, about 3.5" wide, is laying along the length of the bench, resting on two benchhooks.  The benchook to the right, where the sawing actually happens, has a fence rising up on the back edge to hold the board in place while the saw pushes forward.  The benchhook on the left has no obstruction (so that it can hold boards of all sizes) but acts as a platform to hold the board level with the front hook.  You can also see holdfasts, which are candy-cane shaped metal hooks that fit into holes on the benchtop and act as clamps when hit with a mallet.  There are several holes all over the bench for these (and other "workholding" devices) to fit into.  This is a question I get very often: "what are all the holes all over your workbench?".  There is no shame in asking this.  Modern woodworkers often do everything with clamps.  I find workholding one of the most interesting backwaters of woodworking, and I hope to discuss many of the various solutions in the future.


Here you can see the bottom fence on the bench hook.  This is pushed against the bench in use, and since Western saws cut on the push, the harder you work (the harder you push the saw), the more securely the hook is pressed to the bench. Very clever and efficient.  Where it gets weird: since Japanese saws cut on the pull stroke, these hooks will not work.  You would need one which reaches all the way to the back of the bench and hangs on when pulled.


Here I am using a square to find a right-angle to the length of the board, right at the spot we want it trimmed.  While this board was cut before, you can see that its not a very square edge. I use a 6" square for most cuts.  I would love a 12" one, and plan to make a wooden one at some point but for now this must do.  I should note that I have a few squares, and they do not all agree.  This is a relatively new square from Starrett (a premium tool company in Maine), and my grandfather's old machinist's square from his automotive engineering days likes this one, so I do too.


I use a marking knife along the square.  A marking knife is a bit like an X-Acto or hobby knife, but its special in that it is totally flat on one face and beveled on the other.  The flat face is what is drawn against the reference (the blade of a square, the face of a joint socket, or a piece of wood, whatever). This leaves a very straight and accurate knife which has an unexpected advantage - its three dimensional.


Here I have used a holdfast to clamp the board in place on the sawhooks.  By hitting the top of the holdfast with a mallet, its pressed into the hole at a very slight angle, compressing the hook onto the work.  The more you hit it, the harder it holds.  I use a scrap pad of wood between the tip of the holdfast and my workpiece.  You can also see here the saw I use for small crosscuts like this.  Its a fairly new saw, about 5 years old, but is based on designs from the 1800s.  Its made of very thin and light steel, so it has a "back" along the top of it to add rigidity and strength.  This saw is very smooth, very pleasant to use, and very accurate.  I am still fairly new to precision handsawing and I am able to cut a pencil line in half most of the time.  I love this setup and feel something almost like resent towards the fact that I was never shown how to saw like this in the several shop classes I took in Jr High and High School.


The saw drops right into the knifeline, taking advantage of the three-dimensional quality noted above, making it very hard to miss the mark.  As it gets going, the saw is slowly lowered backwards, into the groove.


This cut is very close to the line, and very straight.  You can see the very crisp edge the knife left on the bottom half along with the fuzz the saw left.  A pencil wouldn't deliver that crisp edge, and we will deal with the fuzz in just a moment.


When tested, the light under the square reveals all.  This cut is not satisfactory.  A little bit needs to come off the right corner.  As seen above, a little fuzz needs to be shaved along the whole face.


Enter the shooting board.  This is a jig for planing edge-grain.  Like a miter box, it guarantees that the resulting trimming will be square.  The holes in this unit are for changing the angle of the fence, but right now it is set up at exactly 90 degrees (and true according to the square from Gramps).


The workpiece is held up to the fence, with just a wee nip of it sticking out over the edge.


The right face of the jointer plane (#7) is waxed with a plain ol' parrafin block.


The edge of the work is moistened with denatured alcohol.  This makes working on end grain much easier, though it may not be traditional.  Water works too, but it is not wise to let water onto your steel tools.


The plane put into position.  Turned onto its side 90 degrees from normal use.  Perhaps now the parafin makes sense.  The plane is pushed back and forth in the track of the jig, making a telltale sound as it shears the end grain.  Then it makes very little sound as it slides back and forth.  This indicates its work is done.


A check by the square... Much better!  Thanks, shooting board!


With a square board, we can do do all kinds of fun things...


Sunday, December 11, 2011

Withdrawal


As mentioned in the previous post, we've been traveling a fair bit lately and otherwise pre-occupied. I want nothing more than to be back in the shop, with a fire raging in the stove and my saws and planes singing as they do their jobs.

In the meantime though... all I can do is think about it, do a bit of reading here and there, and patiently wait.

It reminds me of a period a while back when I was traveling the nation in my VW Vanagon camper. If you've ever seen one, you can imagine how cramped it is inside and how daunting it could be to pack a whole life in there for long-term roaming. In reality, once everything is put away cleverly enough, and all extraneous cargo has been shaken out of the system, its quite elegant and hardly anything is visible while on the road.  Over time, an almost ritualistic schedule for packing up each morning emerges. Items needed late in the day or very rarely get put away first, and usually deepest into the compartments or cases. A really wonderful phenomenon emerges here: the items used more often, say throughout the day, will never settle deeply into storage.  Without any effort, they will float on top of everything else.  This organic progression of self-organisation is deeply satisfying in a way that is hard to explain.  Over the days, it becomes automatic to neatly nest everything in a pattern which will provide the greatest utility over the course of the day.

When I was compelled to visit with friends who insisted I stay inside their homes (often against my weak protests), I would lay in their overly-comfortable beds, usually too warm, while my brain would be desperately trying to "pack up" for the night despite having nothing to actually do.  Something would feel like it was missing.

The only other analogy I can draw for this is that as I played a great deal of chess or Tetris when I was younger, I would see the pieces moving as I tried to sleep.  It feels like the same mechanisms were at work with the camper's chores.

Now I am having this happen with woodworking.

Each night, especially when I have not been in the shop, I visualize boards with humped edges begging to be planed down.  I see knifelines waiting to have a saw dropped into them, and I see perfect workbenches with frictionless vises clamping workpieces tightly.  I watch an autonomous plane sliding across a board, a perfect curled shaving erupting from the top.  I realize this is extreme, but this is true.

The desire to be working is deep.  The sounds, the smells, and the tactile feedback (especially of planing) all demand to be experienced as frequently as possible.  Every tree I see while traveling now looks like a potential cabinet.  Those with too many branches look like they would make good spoons.  Seeing mediocre furniture in shops and homes has me wondering about busting them up and milling the wood into something pleasing.  Pallets rotting by the back of a building seem to glow with potential.

I suppose I am falling into "the zone", which I take as a good thing, but it brings with it a bit of a nervous or anxious burden when I can't be working!

Saturday, December 10, 2011

The Consumerist's Tool Chest

AKA Desperate Times Call for Desperate Measures...

AKA Winter's Coming...

Without going into too much personal detail, I will still set the stage by saying a cluster of sickness, injury, and deaths in the family has made for a very chaotic early winter.  As I've been away from the house and the shop, I have worried a great deal about my tools during the extreme changes in temperature and the winter rains.  I've kept the tools oiled and usually visit them regularly to make sure they are not rusting even if I do not have time to use them.

Building a traditional tool chest is high on my list of priorities.  Being realistic, though, it is not likely to happen for some time so I was forced to take some drastic action to protect the core tools.

Purchase of this ugly behemoth is not something I feel great about, philosophically:


It wasn't all that expensive, but it is plastic, unhandsome, and counter to all that my woodworking pursuits are based on.

However, it has a decent seal, is large enough for my panel saw, and a half-step up in Intelligent Design than the plastic tote I had in mind while shopping for some emergency tool shelter.

I'm not able to fit everything in it, but I did get the following in there:
  • Panel saw
  • Tenon saw
  • Rip carcase saw
  • Crosscut carcase saw
  • Dovetail saw


Bench plane tote containing:
  • Jointer (#7)
  • Jack (#5)
  • Smoother (#3)
  • Low-angle block
  • Wax
  • Oiled cloth in small jar


Under the saw till lives:
  • Large shoulder plane
  • Large and small router planes
  • Skew rabbet plane
  • Small plow plane


In tool rolls are:
  • Set of 13 auger bits
  • Set of bevel-edge chisels
  • Misc chisels (mortise, corner, etc)


and a small tray of measuring and marking tools:
  • Dividers
  • Marking knife
  • Marking gauge
  • Squares
  • Folding rule
  • Maybe some other bits


I was not able to fit brace, drills, and a host of handled tools like awls, rasps, etc.  These are, however, ensconced in a seperate bin and should remain safe.

I feel slightly better about this, and while I am still eager to construct a real tool chest ASAP, I am glad that the main tools are now out of harm's way for the most part, and they are stored in a way which is somewhat simple to root through.  It's no Anarchist's Tool Chest, but I have seen (and used) worse.


Monday, December 5, 2011

By Hand and By Eye


This February, I am excited to be participating in a design workshop led by Jim Tolpin at the Port Townsend School of Woodworking.  Called "By Hand and By Eye", here is the description:


This class is based on the research that Jim Tolpin is doing for his forthcoming book with George Walker on the design and layout techniques used in the 17-18th centuries.

These traditional techniques use basic (and simple) geometric techniques to create designs for well proportioned furniture. The notion of well proportioned is ingrained in the human eye and is rooted in the different elements of the piece of furniture having whole number proportions (like 1:3 or 3:5). 


These proportioned dimensions are easy to create using a sector and dividers. A sector is a simple tool made of two sticks hinged together (you'll make one in class).
You can, in fact, create a whole design with out needing to reduce the dimensions to feet and inches (or millimetres)! This can be liberating for the hand tool woodworker - it can help you escape the tyranny of the machine or getting overwhelmed trying to use a drawing program on your computer.


Sounds pretty great to me.  I was sad to miss George Walker's previous design workshop at the school, and also hope to attend the longer session in October next year.  This stuff is right up my alley: I was always fairly bad at math in school but did very well in geometry.  I love using dividers, compasses, and protractors, and the intuitive methods of design and layout which Jim and George discuss always leave me almost giddy.

I hope some of you readers will join me there in February!

Wednesday, November 30, 2011

A Joiner's Holiday Wish List

Note: please also see the post "Think Artisinal"


My family has, to a large part, abandoned holiday gifts for a number of reasons.  We have most of our material needs satisfied, and we've all learned that more stuff does not enrich life.  We do make exceptions: the kids still get some toys and clothes, and sometimes we give each other pertinent books or other small items to show thoughtfulness.  I am therefore not expecting to receive gifts, and don't generally make out a list.  However, I realize many or most others (such as readers of this blog) out there do exchange gifts, and it can save all involved some time and money to point out gifts which are actually wanted.  That said, these are the things on my own joiner's wish list, with a brief mention of why.  Since hand tool work can be so variable, I can't say everyone needs all or even any of these items.  Its impossible to make a list of what "anyone" would need, although the Anarchist's Tool Chest is a great start.  With that in mind, these are mostly luxury and "nice to have" tools.  And so, I present the 2011 Joiner's Wish List.


If you use water stones, as I do,  its important to keep them flat.  Otherwise, your edges will not be straight.  I bought the Norton flattening stone along with my Norton water stones, but it is frustrating to use and needs to be flattened itself after several uses.  This diamond based stone, while not cheap, promises to make good on the failure of the Norton stone.  This is an item I consider mandatory.


The last saw on my list, this is for making very precise and smooth crosscuts in boards larger than the sash saw can handle.  This is a saw which is not used often, but when it is needed, nothing else will do the job as well.  I have loved my Wenzloff and Sons saws, but would also like to try Lie-Nielsen's approach to saws, so my personal choice would be their 12 ppi Crosscut saw.


After my recent workshop on spokeshaves, I need to get one sooner or later.  The Lee Valley flat-bottomed spokeshave is very simple to use, adjust, and sharpen.  I would save the round bottom one until the need really arises. I would choose the A2 steel although both flavors are fine.


I would love to do more heavy stock removal with a hatchet, especially since I live in a forest and have an abundance of interesting hunks of wood available.  Wetterling's Hjärtum Carpenter’s Axe and Gransfors  both seem ideal.  These tools are unique in that one face is flat for precision while the other is beveled for leverage.  A typical hatchet has both faces beveled for as much leverage as possible.


This portion of the plane can be swapped out to provide better results on highly-figured wood, such as some maple I have milled from a tree in my yard.  This very beautiful and special wood demands different tools and approaches, and this replacement frog is part of the puzzle:

The image shows the entire plane, but it is only the guts that are in question here:

50 degree High Angle Frog for No. 3 & No. 5-1/4 Bench Plane + Lie-Nielsen No. 3 Bench Plane Replacement Blade (to be ground at unique angles)

This is a very specific gift and the above is my personal situation.  If you want to help someone improve their planes, you really need to know which ones they are.  As far as I know, only Lie-Nielsen planes offer modified frogs such as this.


Veritas hold-downs and Wonderdogs


While not utterly traditional, you can't have enough of these super-handy workholding devices.  Very cleverly made and very useful.


At some point I am going to have to learn to sharpen my saws.  This vise is an essential part of that operation.  It is possible to build one from scratch, and I might go that route, but a plywood jalopy is not quite as photogenic as this rig.


 Another "nice to have" item, and one which Chris Schwarz recently evicted from his shop to make room.  However, I am not as confident in my abilities to mill tongue-and-groove joints for my upcoming workbench shelves and tool chest bottom.  I would pick the 3/4" model but the 1/2" is tempting, too.  


Certainly not a necessity, since I already have a cheap hardware store hammer which works ok... but these are what I want instead of a sports car or yacht.  I would probably only consider the larger of the two, but they are both a little rich for the likes of me.  Still, this is a "wish" list, right?


Also very high-priced but an engineering object worthy of much admiration.  Believe it or not, it is quite difficult to find a bevel gauge which truly locks its position.  The one I have is so frustrating that I refuse to use it.  I doubt I will ever be able to bring myself to buy one of these, but it is nice to know they are out there.  I am probably resigned to try one of the mass-produced versions such as this:

And on that note, all of these tools are expensive.  I probably do not have to explain that they are meant to last more than a lifetime, and are made by small firms with great senses of craft and ethics.

With that out of the way, here are some less shockingly priced "stocking stuffers" that may not break the bank but still provide much joy:

Books:  My to-read list is long, but these are near the top:

How to Build Shaker Furniture - The Completely Updated and Improved Classic
by Thomas Moser

by Bob Flexner

by Paul N. Hasluck

by Bob Flexner


DVDS:

Chris Schwarz pack:


Little Tools:


These are a really nice design tool. A beautiful way to incorporate "sacred geometry" into woodworking. 


The plain screwdrivers I have do work, but yes I have already deformed some of the slots in my tools by using them.


Again, these are all relatively luxurious tools which are not strictly needed to do great work. Those tools are a bit too personal and subject to different working styles to prepare a list for.  At the same time, these luxury items which a person is not as likely to purchase for themselves can make the best gifts, reminding the user of the giver with every use.

Whether you engage in gift giving or not, and whether you celebrate winter holidays or not, I wish you a fine new year of mirthful woodworking!

I encourage readers to add gems they have discovered recently in the comments.  If any are seductive enough maybe I will add them to my own list.


Monday, November 28, 2011

Erratum: Phil is not Peter

In my recent post about artisinal toolmakers, I made an embarrassing mistake by listing the holdfasts I had made by Phil Koontz (or, intriguingly, possibly made by Phil's partner "Jake the Russian") as made by Peter Ross.  Peter's work has a great reputation, and hence it was in my bookmark file.  When I scanned for "P", his url popped up and it sounded correct in my haste.  This is no excuse; it is merely the explanation.  I do hope that anyone interested in handmade metalworks will visit the sites of both of these smiths and see what they can do for you.

I had Peter's site marked because I would love to take one of his classes about making metal name stamps at The Woodwright's School one of these days.

Deep apologies to both men for the confusion.  I owe you both a few days of floor sweeping.


A Trip to Portland

This weekend I took part in a class at the Northwest Woodworking Studio in Portland, Oregon. The title was Hand Planes, Spokeshaves, and Scrapers, and that is a fairly accurate description of the content.


I'd been looking forward to this workshop for several weeks since becoming aware of it. In the end, I am glad I attended but have lots of mixed feelings about it. It is difficult to seperate out what was just not right for me, as an individual, from what was actually ill-conceived about it. I do not wish to really go into it publicly, since perhaps it was just not the right course for me.  I do believe the description was misleading, and have addressed this with the school.

In the meantime, I wouldn't hesitate to go back if a course were appealing.  There is a class on building a brass hand plane I would love to take.  I would offer caution, though, to anyone thinking that this hand plane course has the information needed to get going in traditional hand tool work.

Perhaps I will follow up on this soon (if/when I hear back from the school on my concerns) but in the meantime, I do encourage taking classes whenever and wherever possible, and sharing the experiences with other woodworkers, good or bad as they might be.

Wednesday, November 23, 2011

Think Artisinal for the Holidays

The holiday shopping season seems to start earlier every year.  As soon as the Halloween candy goes away at 6pm on October 31st, employees are hauling out the Christmas lights and tree stands.  Shopping advertisements get out of control and show no signs of stopping.  I want nothing to do with any of this, and yet I also have a pragmatic "if you can't beat them, join them" mentality.

A "Joiner's Gift List" post is upcoming, and I have vowed to myself not to post it until after Thanksgiving.  However, I want to get this out there as my counter to the lamentable "Black Friday" shopping phenomenon.

Independent artisans are still out there, and this is especially true in the woodworking world.  Some of the very finest tools are not made by large companies with zillion dollar budget, but by people in garages and basements with more pure passion, skill, and experience than any mass-market tool corporation can dream of.

I've been very pleased by a number of tools made by these independent makers and want to share a few of them in case any of you readers know a woodworker in need of something special.

Artisinal toolmakers are keeping old flames of knowledge alive, and when applicable, adding modern technology, materials, and twists.  They provide customer service not possible for a large company.  In many cases, if you have a unique need, they are happy to fulfil it.  This is also a gift that gives more than once; you are not only giving a beautiful, comfortable, and effective tool, but you are allowing the toolmaker to continue their existence doing what they love.  There is an added somewhat subversive joy in withholding your gift-giving funds from large companies who use much of your money for parasitical services, fees, marketing, expense accounts, international travel, executive perks, retirement plans, and all the other drains which have nothing to do with the products at hand.

If you are reading this blog, you probably already understand the value of domestic [note that in the case of heirloom tools, importing from an artisan is wholly worth considering] , old-fashioned tools designed to outlive the user.  If not, please consider this and if you need a mental jumpstart on the topic, do yourself a favor and read Chris Schwarz's The Anarchist's Tool Chest.

Without further ado, these are some of the items which have worked very well for me so far:

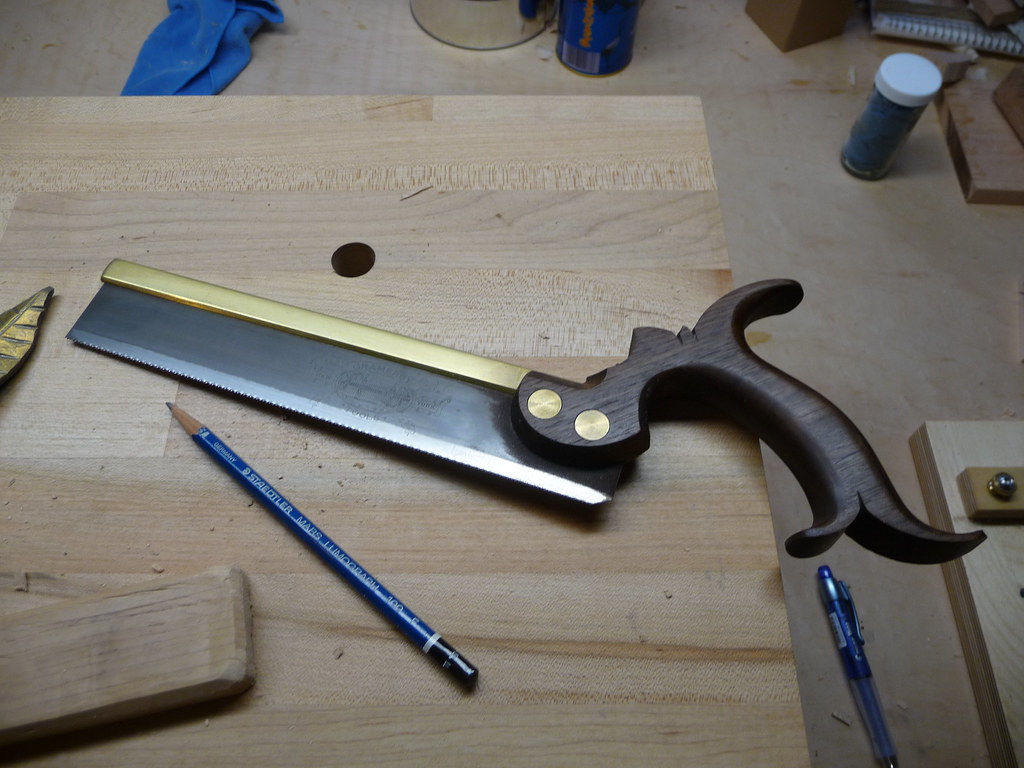
1. Wenzloff and Sons Saws

I'm not going to suggest specific saws, since this depends on the user and the type of work.  I have a rip panel saw and a tenon saw from Mike and I love them both.  Mike (and his sons) essentially rebuild replicas of the finest saws ever made, but using modern tools and techniques to bring them into the 21st century.  Its a real pleasure to talk to Mike on the phone about your needs, and have all of his experience at your disposal in suggesting a tool.  They are not cheap, and yet, given the quality and the lifespan, they are not expensive either.  Here's my rip saw, based on a design by Harvey Peace:


2. Phil Koontz Holdfasts
Pictured above as well as below, these are real works of art.  I use a pair of them in conjunction with the excellent Gramercy holdfasts, but I always take a little more pleasure in using these.  I cannot say they are a workshop necessity, since the more affordable Gramercy holdfasts work very very well, but their elegance is frankly a real mood-lifter in the shop.  The sharp tips of the leaf shape lend such a precise and nimble gripping force that it I honestly look forward to excuses to use it.  To me this is the sign of a superb tool. Again, the joy of supporting an artisinal blacksmith like Phil is worth it, but that goes double when the tool is of such high quality.  My honest suggestion for a typical handtool worker wanting to do it right would be to get 2 pairs from Gramercy and 1 pair from Phil.

3. Blue Spruce Toolworks

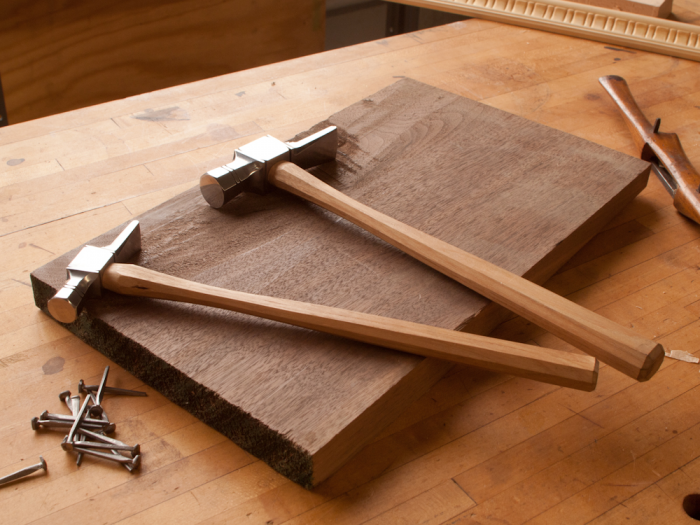
I don't have many tools from David Jeske, but I am already in love with the 2 that I do use. Made in his home shop near Portland, Oregon, these are wonderful to look at, hold, and use.  I have his marking knife: an ultra-glorified X-acto type knife for making reference marks and severing wood fibers with the bonus benefit that tools such as a chisel can register right into the cut. I also have a mallet from him, made of beautiful maple impregnated with resin so that it is strong, light and incredibly well-balanced.  I have not used his chisels or other tools but I believe it is safe to assume that they are equally well thought out.  The marking knife is in the center here, and the mallet is near the top.


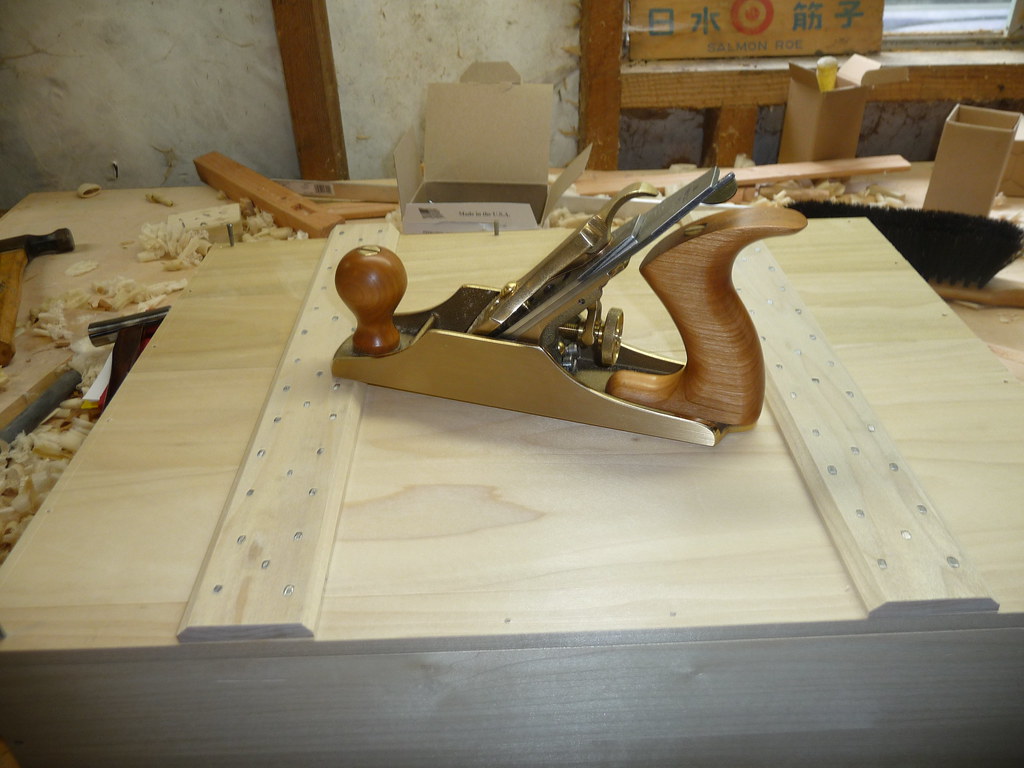
4. Glen Drake Tite-Mark gauge

Shown at left in the photo above, this is a very pleasant to use cutting gauge. Any woodworker would love to have one of these, and if they already have one, having more is always better.  If you are not a woodworker and can't understand why you would want more than one marking gauge: these are very, very precise instruments.  It can take a few moments to really dial it into the correct position (dial is literal in this case, with the knurled fine-adjustment section).  Once you do, you don't want to do it again.  A given project might have 5 or 6 crucial measurements, and it makes a lot of sense to set the gauge once, and leave it for the whole project.  Its very, very, very nice to have multiple gauges, marked with masking tape, for each tenon, board width, groove, etc in the project.  3 or 5 of these admittedly pricy tools should make any woodworker squirm with the glee that only comes when total satisfaction is reached.

5. Ron Hock plane irons

Perhaps the finest aftermarket plane irons available for your vintage tools.  Not only are the blades nice and thick, but his chipbreakers make a huge difference in the stability of your tool.  A very affordable upgrade for your garage sale find.  Ron is fast to communicate, and is able to meet special needs.  Highly recommended.

6. Various services

I have had a very positive experience using Bob Rozaieski's saw sharpening  service.  Fast, affordable, and very effective.  I know there are many other sharpeners out there, and I will probably try them until I have my own abilities locked down, but in the meantime Bob is the one I can say I have used and enjoyed.

Joshua Clark's Hyperkitten Tool Shop is amazing.  I almost hesitate to mention it because I do not want competition from other customers, but the kitten is out of the bag, as they say, so do yourself a favor and tell Josh what you are seeking and you'll quickly see for yourself that he can find it and you will be impressed with his discerning service.

Even if you don't know a woodworker in need of gifts, I hope that this post serves to inspire you to consider doing business with individual artisans and small firms whenever possible.  Without getting too philosophical, I believe these types of businesses are the future just as much as they are our past. Top-heavy corporations with homogenous products will never be able to comfortably suit a craftsperson's needs.  Just as its almost impossible for me to find shoes which truly fit due to my mutant wide feet, I am much happier with the wares from these small makers than I am with my mass-produced tools.  Its reassuring to know that your money is going right to the makers, with very little middlemen, ridiculous trucking and warehousing, or salaries of people who have no role in the actual toolmaking inflating the prices.

I personally encourage you to turn Black Friday into Buy Nothing Day, but come Saturday, why not look up some of these small tool makers and see what they can do for you and those you love?

Plane Tote

This weekend I am attending a workshop at Gary Rogowski's Northwest Woodworking Studio in Portland.  The topic is Hand Planes, Scrapers, and Spokeshaves, and we are encouraged to bring our own tools, especially if we have questions about them which I certainly do.

I'm bringing the main 3 bench planes: a jack/fore (vintage Stanley #5), a jointer/try (vintage Stanley #7) and a smoother (a brand new Lie-Nielsen #3).  The jack has given me no problems, I feel like I understand it pretty well.  I've added a Hock iron to it, ground at a 10" radius which works beautifully for taking deep scoops out of the wood, and when I put the stock iron back into it, I can almost dial it in to a smoothing-like role.  However, I also bought a Hock iron for the jointer plane, and I cannot get it to fit right.  I believe the mouth needs to be filed open, but I need someone who knows more to confirm this before I destroy the body.  My smoother works very well, usually, but I am still getting tracks (lines on the edge of the planed area) fairly often, no matter how I adjust it.  I'm hopeful that the workshop will address these concerns and ensure that my tools are tuned and ready to go.

I've also had trouble getting my cabinet scraper sharpened properly, even though I have read perhaps a dozen "how tos" on the subject and they all make perfect sense.

At any rate, since I do have questions about my own tools, and not just general questions about how to use these tools, I am bringing them with me.  As I thought about how to transport them, I couldn't really come up with a good answer, so I had to make something.

This tote is brutally simple - based in large part on the packing boxes.  It was made in half a day.  I would have liked to have spent more time, but I just did not have it.  It will serve its purpose (to hold my planes for the car trip and allow them all to be safely carried with one hand), though I still intend to add a lid to it.  It might even be a semi-permanent home for them until I get my toolchest completed.  It has room for the 3 bench planes, the card scarper, burnisher, spare plane irons, block of plane wax, and a "woobie travel tube", which is a spice jar doused with jajoba oil and a saturated synthetic towel, used to wipe down and oil the tools.  Its nailed together - no fancy dovetails, and the handle was quickly shaped with a bowsaw and a couple rasps.  It will not win any beauty pageants, but I feel much better about sticking my planes in the back of the car in this tote than I did with any of my other ideas (cardboard box, rolled up towels, etc).


This was a fun project, using a couple lessons learned in the packing box, such as not bothering to carefully dimension the end pieces, but roughing them and then trimming in place.  I actually measured nothing - I set the planes down on the floor piece, and cut accordingly.  All other pieces were sized to each other.  This is a fast and enjoyable way to work!  The proportions therefore do not follow any pre-approved or golden ratio, but this is a purely utilitarian object and not furniture.  I am already fond of it though, perhaps because it fills a huge need not only raised by the workshop, but the fact that my current workbench is not in the shop, but in an adjacent room and I do have to carry the planes back and forth frequently.  I've been wanting to make one of Jim Tolpin's totes for a while, and still plan to, but this is already a welcome addition to the shop.

And before the flames about storing planes sole-down: I retract the irons before setting them in like this, and they are also up on tiny shims for good measure.