Monday, June 30, 2014

Rehab Continues

In part one, we saw a drawer needing a new bottom. Now, we see the case needing a new back.


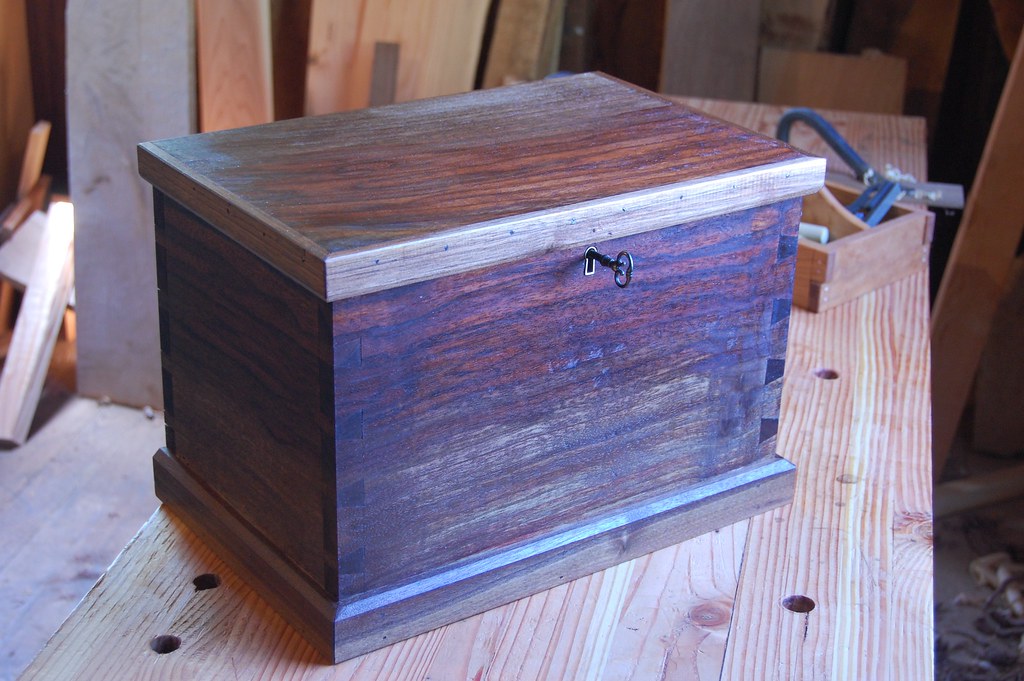
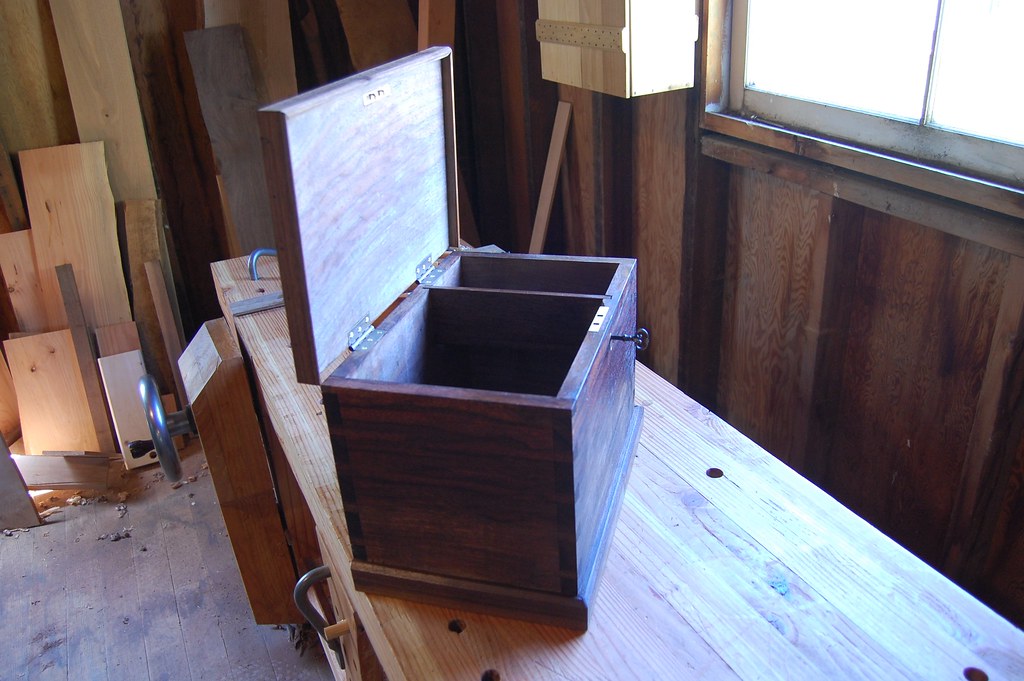
Looks kindof cool with no back, but that is not so functional. All the envelopes and stamps and paperclips this is meant to be stuffed with would fall right out and then when the Roomba came to sweep the floor, it would jam and play some weird chimes. So what about the existing back?


It suffered the same fate as the drawer bottom. The veneer had started to delaminate and the intermediate boards were warping and rotting. Kindof interesting, here, to see that the boards were held together with tape. This must have been a pretty classy outfit (not being sarcastic, it is a good idea, I guess?). I'm still unclear if this double-veneer sandwich would be considered plywood or not, but since it has tape in it, which lends an air of handwork to it, I will not use the p-word.


Here you can see a bit more of the damage, as well as the rot setting in.


I didn't have any more of the nice, wide Doug fir to throw at the back, but I do have a pile of cedar fence boards. These things are about $1.50 each and usually really wet and full of knots. I cherry-picked a pile some time ago, however. If you spend enough time, you can get several almost-clear boards, so long as you politely re-stack the pile. You can see here how furry they are. Good enough for a fence, maybe.


Enter my shameful friend. Since this piece was obviously produced in a factory (albeit a cool, old-timey factory with hand-taped veneer panels and drilling jigs for dovetails), I will not mar it's spirit by using my trusty thickness planer. I just put some new knives in, and kindof regret that since there are indeed some knots in these boards... but you gotta do what you gotta do.


Dust-collection archeological strata from bottom to top: Doug fir, cherry, walnut, cherry, Doug fir, and cedar. Every sack of junk has a history. The walnut, being an allelopathic plant, sadly renders this pile of shavings useless for the garden-- I would generally use these to cover paths or prepare long-term soil beds, but instead it will go to a friend with a burn pile. Wouldn't it be cool to have a dedicated planer for toxic species, and another machine which would just spit the shavings right into a compost/mushroom growing pile?


The boards look pretty good when they are done. A bargain if you have the time to let them dry out before you plane them (at least a year or more, around here)


They need to be jointed on the edges, they come pretty rough. Here you can see the sliding deadman in use. It helps tremendously to have the support in the back.


Square is as square does!


The goal here is to shiplap to boards, so that they can overlap to block light and material, yet still have some room to expand and contract. This is like copout tongue and groove. Where a tongue would normally fit into a groove (being "2 tongues"), shiplapping is having just tongues, but flipping every other board so that the tongues nest.


The first step is to lay out the line with a cutting gauge. A pencil won't work here because what is needed is a tool track. Very powerful stuff, the tool track.


Since shiplapping is essentially creating a rabbet, one might reach for a rabbet plane. An adjustable fence, a depth stop, and a skewed blade would be really nice. Since this is along the grain, a plough plane with an iron wide enough to hit the edge would be fine, too. But in this case... since the scale is so small, it is time for Li'l Shoulder to make an appearance.


The corner on this bad boy is ground to a sharp 90 degrees, so it registers right into the layout line. It should be clear now why you need a physical cut line, and not just a pencil. The plane clicks right in, and it does not take much effort to steer it down the track. It is started with an angle, around 45 despite what is shown above.


This deepens and widens the cut, creating a fence for the subsequent stroke. One of those things which gets easier and easier with each pass. It becomes possible to do the later passes without looking. Please look, though, because you might otherwise plane your fingerprints off.


Nice spiral shavings emerge, which are great packing material for an artisinal Etsy shop. I keep them in a velvet pouch waiting for the day when I have an artisinal Etsy shop.


There we go!


That is what we were after... nicely shiplapped boards. They will be installed with a bit of a gap between them, so that they can expand (close the gap) and contract (open the gap) but still have enough overlap that light and postage stamps are blocked from passing through.


It helps to number the boards as they are laid out, but number them on a face you won't see, unless you want to plane them off later.


I didn't measure a thing. I centered the first boards, and worked outward towards both sides. On the final edge boards, I make a mark where they need to be trimmed, cut a tiny bit (like one plane stroke) fat, and then plane down to the mark.


Bam! This handtool stuff is nice.


Using dividers is a good way to capture the location of the blade on top of the drawer. The backing boards will be nailed into this.

The dividers then place a prick on the boards. Again, no "measuring".


The prick from the dividers serves as a handy index to drop the marking knife into. A square is held up against the knife, and a line is marked. On a fine piece, I would then drill, and then plane off the layout lines. Since this is the back of a sortof unfine piece, I think I will keep the layout lines as a reminder that a person refurbished this at some point.

Still todo: reinstall the hardware and continue with the surface refinishing. Current plan is a dark shellac and some dark wax, but some time must pass before the tung oil is cured. 

Sunday, June 29, 2014

Inpatient Rehab

Not me... but this cute little secretary desk I was asked to repair. I have had something like this on the builditsomeday list for a while, so a chance to inspect it was welcome.


This unit's main issue, functionally, is that one of the support hinges is missing, and the other was horribly mangled. There do not seem to be any direct replacements on the market, so I will probably order something slightly different.

Cosmetically, the thing needed some TLC. At some point, it had been stripped and re-stained, and then later someone had tried the same thing again, but gave up after only sanding the easy parts. This makes lots of mismatched coloring.

I was able to remove the top cluster of shelves (this is called the "gallery" if I am not mistaken) by removing the back of the unit. However, the back itself was trashed so I will replace it with new material. I was told by the owner that plywood was fine, but I just take that as a challenge.

The gallery, "before". Note the sloppy sanding inside the compartments.


The original back was plywood of sorts. It was several boards of 1/8th white wood covered with veneer on both sides. The back was painted black on top of that. The boards had warped in alternating directions, creating huge bulges in the veneer and popping over the nails in some locations. I think I will use shiplapped cedar to replace the back, but first things first...

I cleaned the whole unit with denatured alcohol just to get a better look at it and sense of what it looks like wet. I then did some exploratory sanding to see what was under the various layers of finish. Next was an overall sanding of the inside of the gallery, the most important part. The exterior of the piece looks like it just needs some fresh oil and wax, not a complete refinishing. I sanded the interior of the gallery as much as I could within scope of the project... that is, I was not going to take it apart or rebuild it. The task was to paint it if need be, but not to put "too much" work into it. I'm optimistic that perhaps with some dark shellac, it can remain "wooden" looking while evening out the color variations.


Step one has been to simply apply a layer of tung oil on top of whatever is there. It looks pretty good, at least while wet:

So far, so good!


While taking out the main drawer to oil it's face, it became apparent that the bottom of that was in the same bad condition as the back of the unit. It was also made of the same type of veneer sandwich.

You can see the "real" wood in the bottom right corner. I thought about "reclaiming" the boards from under the veneer but after seeing how nasty they were, and how thin they already were, they went into the fire pile.
I had some sortof-thin Doug fir sitting around which seemed like a good candidate to make the drawer better-than-new. These are boards cut from my property in Oregon, and have been drying for a very long time. While I usually hate to plane down a board excessively, these boards which were essentially scraps, went from 1/2" to 1/4" thick via the magic of my favorite cheat: the thickness planer.


Rather than messing with carefully laid-our rabbits, I simply fielded the bottom panels with a bevel using a jack plane. It was very fast work. Nobody looks at the bottom of drawers anyway, and if they did, they would go "wow, someone did this by hand with a plane! Nice!"


As I knocked the drawer apart, which was thankfully easy, I did notice that originally it was glued. Failure over time? Had someone already busted it apart and put it back together without fresh glue? I doubt it. I assume that the glue just didn't hold up all that well.


I also noticed that these dovetails were, at least initially, machined. The round sockets indicate drilling. Planer marks were visible on some of the panels as well. This may not be a relic right out of Roubo's shop, but still a piece handsome enough to give some new life to.


And a new lease on life for this drawer. The new bottom should last another century or two. There is a little room in the back of the drawer for the boards to expand, so I glued it in the front but the back is floating. I also tacked in the back with a tiny brad, thinking that it will hold it firmly, but move as a spring if need be during expansion. I'll let you know in 45 years how that went.

Next up will be to re-assess the main unit once the tung oil dries, and then perhaps play some games with tinted wax and shellac to try to even it all out. Oh yeah, and making a new back. Stay tuned.

Sunday, June 22, 2014

Standing Desk

I've wanted a standing desk ever since having a convertible Anthrocart at my last office job. Standing feels so much better for long stretches of coding or design, but there are times when I want to sit so was not quite ready to go for a dedicated standing desk at home. Nor was I willing to pay for something like an Anthrocart.

I'd notice a popular trend of using an inexpensive small Ikea table or shelf to create a standing-height work surface on a normal desk, but of course I had to try something homemade.

I made a simple trestle table in miniature, with a lower shelf acting as a stretcher which is secured by wedged through-tenons. The base and top are maple, the shelf is cherry. I was able to get the height perfect for my own standing posture and let the other dimensions unfold from there.

In this configuration I can easily stand to work on the laptop, or sit down to use an external mouse and keyboard if needed. The whole desklet easily pushes forward to create more "real" deskspace.

Building was simple work except for the wildly figured maple top. Many of my usual tricks failed on this board, and I ended up doing a lot of scraping by hand. After all that, I think the figure is kindof ugly... but it will usually be covered and it's always a good learning exercise to deal with a nasty board. I have some other boards from the same tree that are incredibly beautiful, but you never know until that first layer of fuzz is planed off.

This was in part a warmup on tenoning, since I will soon be building a full-sized dining room table.

Side project while the tung oil was curing: little locust brackets to hang some guitars so that I will remember to practice more often. Some people say guitars should never be hung, they should live in their cases. That is wisdom I accept intellectually, but I end up never playing them when I do that, and life is short. Now I need to make some little shelves for the speakers...


Saturday, June 7, 2014

Walnut School Box

In The Joiner and Cabinet Maker, Thomas works primarily with deal, being a generic term for what was likely a softwood such as pine. While attempting to remain faithful to the projects described in the book, I have scoured the west coast for suitable deal-like woods. I've worked with hemlock, Douglas fir, western red cedar, yellow cedar, Port Orford cedar, spruce, ponderosa pine, and others. Very few of them offer the creamy workability advertised for Eastern white pine, which is not generally available here. I have therefore decided that my "deal" is to use regional hardwoods which balance affordability with workability. Poplar is nice to work with, but not stable over time. Alder and cherry are both excellent. This time, however, I used a plank of walnut milled from a local farmer and woodworker's acreage.


Construction is at this point very straightforward. I don't consult the text at all, I have it fairly well memorized. I still resist temptation to deviate from Thomas's plan much; I still use a birdcage awl to make the hole for the lock (although it is tempting to use a cordless drill). It is also tempting to dovetail the moulding since that is actually easier than accurate miters by hand. I did, however, step away from the strap hinges and opted instead to use brass butt hinges. The strap hinges hold some appeal but they are so dark that I thought they would be lost in the dark walnut. I was also tempted to add some lifts on the side but decided to keep it simple. I do like how this one turned out. I hope the recipient enjoys it.