"After going on in this kind of way for a long time, Thomas has a very much nicer job than ever he has had yet given him to do one day for Master John, for whom we remember he once fitted up a rabbit-hutch. Master John is now going to school at some distance from home; and he wants a box to take with him to keep his books and playthings in. It must be made strong, as it has to travel; but it must also be near, as it will stand in the school-room, and smooth, that the things put into it may not be injured. Mr. Jackson comes up to the bench at which Thomas is working one morning, and desires to see the last dovetail that he has made, for he has seen him now and then practicing."
-- This and all of the following quotes are from The Joiner and Cabinet Maker, 1839
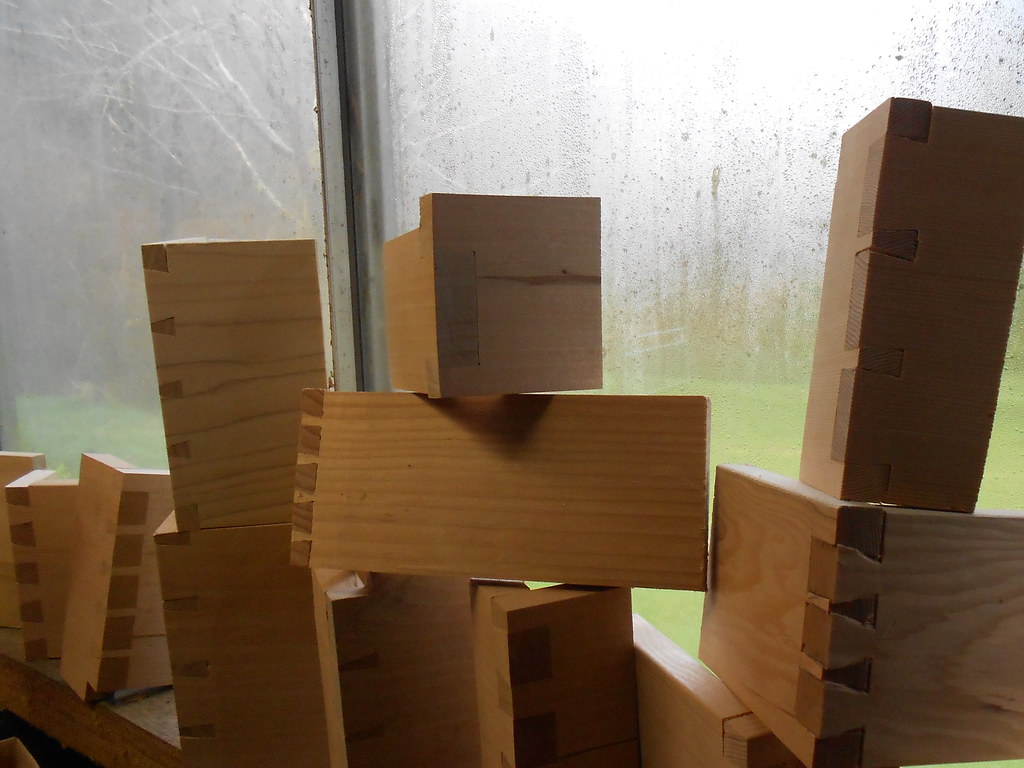
That brings us to where I left off before the recent travelogue posts. I had just concluded Dovetail Month, which was not actually 31 days in a row of making dovetails, but making them whenever possible until I felt I had them under control, and this indeed happened around joint number 30. I still have a long way to go, but believe I am ready to make a very simple box, such as 14-year-old Thomas was asked to.
Here is my last dovetail:

"Well, really it is not a bad joint," says he, when Thomas has shewn it to him, "and I am very glad to see it, for I think you will be able to make the school-box for Master John..."
And so without further ado, today begins the Schoolbox phase of the Joiner's Apprenticeship. Several of these boxes will be made; I will attempt to detail the first one fairly thoroughly from start to finish, and subsequent boxes will be built in silence although I may stop to focus in detail on a particular operation, tangent, or phase of construction. I will likely also interrupt the boxes to build a new workbench, as well as some other small projects. When possible, they will also be documented here.
As for the box, here are the specs:
"It must be made of three-quarter-inch deal*, and firmly dovetailed at the corners; it must be planed smooth inside and out; it will have a moveable partition inside, for which Master John will give you the exact orders; it will want a good stout lock and hinges; and the outside dimensions will be fifteen inches long, ten wide, and ten deep without the lid. In looking out the wood, you will take care to choose a nice clean board, as I should like to see you turn out a really good-looking box for Master John to take with him."
*See also: "The Deal with Deal"
I've had to make an executive decision to deviate from authenticity when it comes to the woods used in the book. "Deal" was a generic term for a range of sizes of boards from any number of softwood species relatively common and cheap in Thomas's time. It was perhaps Pine from the Baltic region, imported into Britain. There are two considerations in sourcing my own deal: 1) It should be cheap and readily available and 2) it should have characteristics suitable to the type of work being done. If I lived in the Northeast, Eastern White Pine would be the wood of choice. Descibed as "creamy and hand-tool friendly", I tried hard to get ahold of some. Even if I only used it once, as a control group, I wanted to know what a good pine was like to work; the pine we get out here is pretty nasty. I looked around and found the local equivalent for cheap and common to be Douglas Fir and Hemlock.
I am familiar with both, as Douglas Fir is the ubiquitous construction lumber here (think 2x4s), and Hemlock is a common material for trim. It is relatively attractive, a bit more dense and easy to work the Douglas Fir, and middle-to-low in price. Douglas Fir is just too splintery. It can be worked, and I will be using it for my workbench and future furniture. I am considering it for the interior pieces of the chest of drawers. However, it is no fun to dovetail and might be better left for an Apprentice with more skill than I.
Hemlock, then, was what I had planned to use as deal for the duration of the Joiner's Apprentice project. It was for that reason that I started my dovetail lessons on Hemlock boards. The Hemlock I have is workable, though challenging. It has a bad tendency to chip out while paring, leaving foam-like perforated surfaces instead of the glassy smooth texture I want. I may still use it in the future, but so far I am feeling that the best choice for these boxes is a hardwood.
I have tried working with some local hardwoods, Maple and Alder. Maple is very challenging to work with due to its hardness, but results can be exquisite. It is unfortunately too rare and expensive to serve as a learning wood, and I feel it would be sinfully wasted on projects such as these.
Alder is a hardwood, and so is certainly not "deal". However, it is a weed-like tree in this region, growing anyplace it is allowed (and there is enough groundwater). It is perhaps more often used for firewood than for lumber here, and is not common in lumberyards. It is, however, common to find it milled by those with home mills, since they certainly have many alder trees on their land. I have been fortunate to come by two neighbors with alder boards for me to use. I find it enjoyable, very strong, and attractive. Jim Tolpin calls it "poor man's cherry" and I think that is valid. It can develop chatoyancey, a type of depth and shininess in some woods, and considered very desirable. Therefore, as Alder is the best wood I have available which is nicely workable and affordable, it is my default "deal" for this project.
The author continues to explain how the box should be made:
"As the box will be about nine and a half inches deep inside, and the wood is barely nine inches wide, it will be necessary to make each side and end of two pieces jointed together. A narrow strip only would be necessary, but it will be better to join a piece of two inches wide to the width of the board, by which means the joint will be stronger, as we shall see afterwards. This joint is made just as those were in the top and bottom of the packing-box, except that when the edges have been planed quite square and strait so as to fit nicely, they will have to be glued."
Perhaps furthering my hunch that alder is the right deal for me, the boards I have selected are indeed just about this size. I did have to rip the live bark edges off, which although not unpleasant, is tiring work. In fact, I will confess that when I realized I would be making 4 or so rip cuts, I thought about how easy it would be to set up the table saw. However, I am not doing this to make boxes as quickly as possible, I am doing this to learn to use hand tools. I would learn nothing about ripsawing by running the boards through a table saw. Still, I had that moment of wanting to justify it, since Thomas's boards came from a saw mill and no doubt had the bark removed and were probably rather square, too.
Like Thomas's wood, mine is rough. It was cut with a chainsaw mill, where Thomas's was likely cut with an enormous handsaw of some sort, perhaps a pit saw. Mine might be rougher than his was, but in any case my lumber serves as a rather authentic example of what Thomas would have been working with, albeit not "deal" as discussed above.
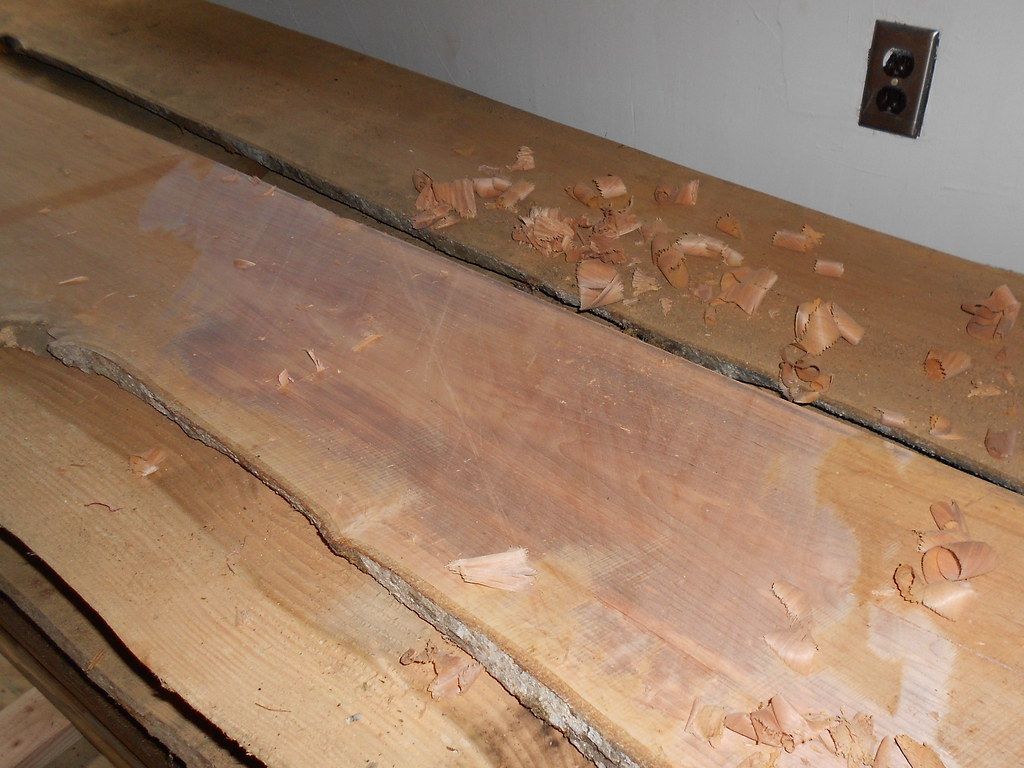

To get an idea of what I was working with, I used a plane to quickly rub off some of the roughness on the face of a board. The board's own weight and inertia were sufficient that I did not have to hold it down or move it onto a bench, I could just plane it right where it was on the stack (witness the shavings in the image above). While the board has a couple minor knots here and there, it is indeed rather nicely grained overall. There are a couple spots where the grain goes a little crazy because branches were nearby as the board was cut. Aside from some difficulties in working these areas, I believe this will add some beauty and interest to the boards. If they end up being an enormous hassle to work around, a lesson will have been learned.
Ignoring the fact that I need a long, continuous strip for the box's molding, I went ahead and crosscut the board first. I'll deal with the molding later (from another board). I needed to knock the board down into manageable pieces because I do not have a full-sized bench yet and I figured it would be simpler to plane relatively small boards rather than a 9-foot slice of a tree.

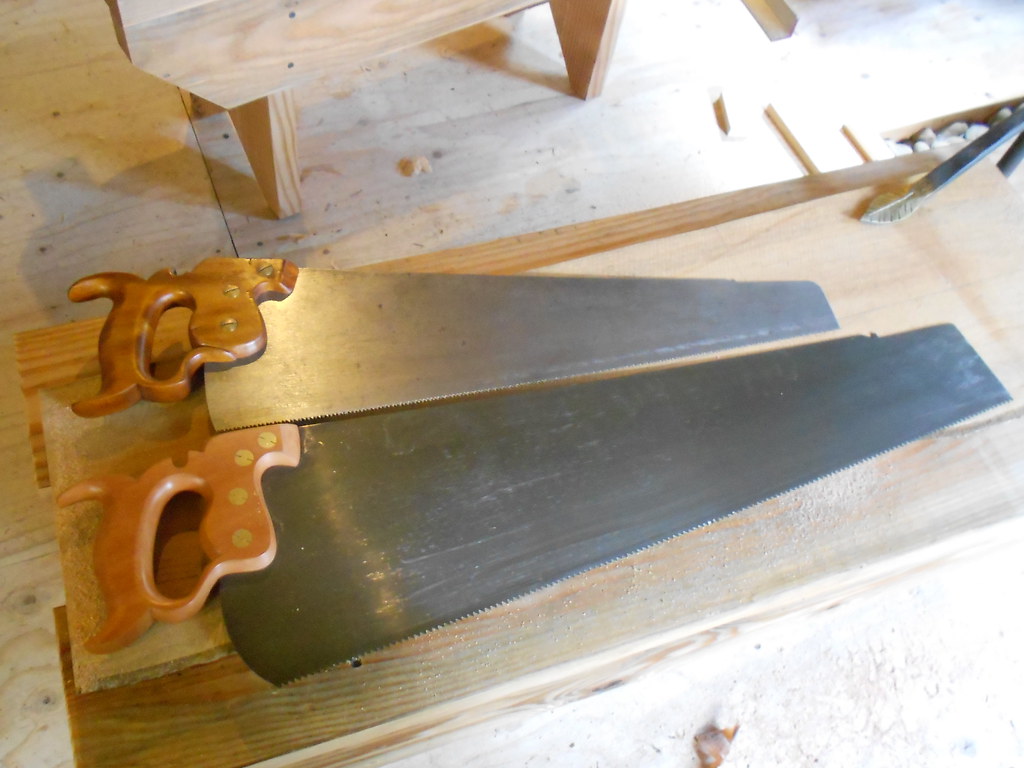
My coarse crosscut saw (an ancient Disston) would have been the right tool for this job, but I have been wanting to get familiar with my tidy little fine crosscut saw (from Matt at thesawblog.com). It has a delicious osage-orange tote which is just right for my 3/4 scale hands, and is the perfect length for my 3/4 size body; no danger of the saw's toe (tip) hitting the floor as I saw. As it is a fine-toothed saw, it may cut more slowly, but very nicely. It is by no means slow, however! It screamed right through the board with very little effort, and it leaves a very smooth surface behind indeed.
One end of the board was checked, or split. I suppose my neighbor should have painted or waxed the ends before storing, but as a beggar, I will not dare to be choosey. I kept the "good little pieces" for some future use. I then roughly measured the board and marked it to be cut into 3 pieces; one for the 2 ends, one for the two sides, and one for the 2 extra strips which will be joined to the other boards. I will take the top, bottom, partition, and molding from another board.
I then needed to rip off the bark edges where the joints would be. I did leave it on the unjointed edges, as they will need to be trimmed anyway and I do not yet know how much, so ripping now could create extra work as the excess will just have to be ripped again later. For the ripping operation, I use a Wenzloff and Sons saw modeled after a Harvey Peace design. This is a beautiful saw, pleasant to hold and works well. It is slightly long for me, but worth the care I must take to avoid hitting the toe on the floor. Here's a shot of it just to show how it is a bit larger than the fine crosscut saw:
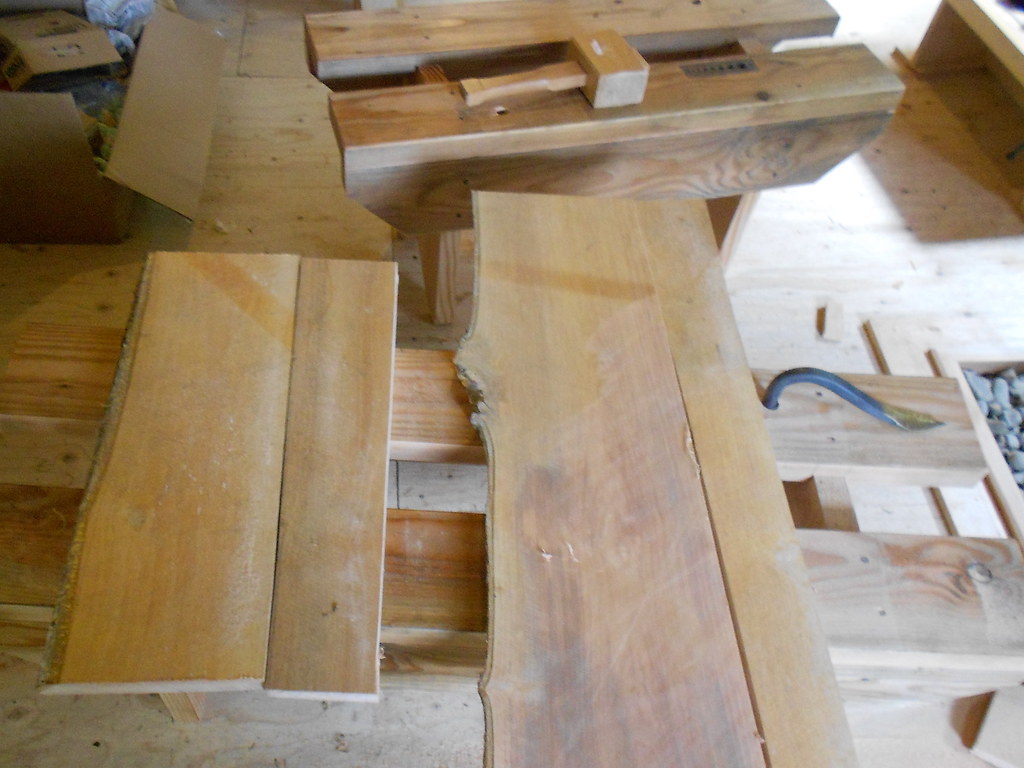
Putting one of the boards on the saw bench, I ripped it down the middle to create the two strips to be jointed to the side and ends. I then ripped the bark off of the faces to be jointed. This left me with four boards, which will be glued into two board, which will then be cut into four boards. Follow me? No need, it will become clear if you care.

The final harvest, laid out as it will be jointed. Each of these will, once glued, be cut in half to create the two ends and the two sides of the box:
I just covered planing rough stock in my dovetail box post and so I will not go into detail. It went well and I learned a little bit more about reading shavings from my jointer plane. I suspect this will never stop happening; from the sounds of the planes to the vibrations in the hand to the thickness, spiraling and width of the shavings, planes are very communicative tools. Verbose, even.

Eventually I had all four edges smooth and straight. As the faces of the boards were still rough, I could not verify they were square to them, but I did try. It doesn't really matter anyway, as long as they are reasonably square, because both faces will be planed down after jointing, and even a joint shaped like a ^ has a straight board in it somewhere. I aspire to perfection, but in this case what is important is that I get my 11" out of this 14" or so board, and that is a fair bit of slack.

Here you can see an early test fit, and if you look closely you can see a small gap on the right edge. You can learn a lot placing one board atop the other, and seeing if it will rock, spin, or stick. After some adjustment, I achieved a pretty good fit. I applied liquid hide glue, which had been warming all along in a bath of hot water, and clamped the boards. With "real" hide glue, no clamp is required, but I am not there yet. I am using modern "liquid" stuff which is a bit of a compromise, but I need to focus on the woodcraft right now, not my skills in tending a pot of boiling horse-hoof and attending to the various cups, brushes, and other paraphernalia traditional gluing requires. Someday, maybe!
Again the book aligns with my own experience quite nicely (except I might have to wait longer than tomorrow morning):
"Having thus jointed the four pieces for sides and ends, Thomas must leave the glue to set before he does anything else to them; and as it is already afternoon, he waits until the next morning."
Next time, I will clean the glue and flatten the boards, hopefully bringing them into shape so that they may be joined via dovetail. Thanks for joining me on the road to the schoolboxes!
"good little pieces"
ReplyDeleteI assume you're referring to the blog? I really enjoy reading that one. As well as the Literary Workshop. And yours.
You've been posting frequently of late, and at length. Keep up the good work! And man, your skills really seem to be coming along. You're progressing faster than me :0)