Thursday, January 17, 2013

[School] Week Two

With two weeks almost over, it is hard to believe how fast time is flying. We are busy from the first moments each day until the last. We start with warmup exercises or continuing to work on projects, then have a brief lecture, and then continue with projects and exercises for the remainder of the day.

In week one, we continued with green woodworking by making rustic stools.


We then continued to slightly more delicate work, making plates and platters for the school's kitchen:


A great sense of acocmplishment surrounded the completion of the stools:


In week two, we started to learn the techniques required for benchwork and joinery. We built straight edges, such as these:


With the ability to detect straight lines, we were able to then construct winding sticks. Most of the students completed those today. They required jointing of edges, gluing up laminations, creating parallel edges, precision cuts, creating bevels with planes, and trimming end grain. In short, many lessons were contained within these deceptively simple tools. As sawing and planing skills progress, we will soon be working on building try squares. It is quite a feeling to use a layout tool, accurate to a thousandth of an inch, which was created by hand!

I am too busy to take many photos, these are also courtesy of Tim Lawson. As we delve deeper into the types of benchwork I am familiar with, I may have more commentary on the topics and the concepts. For now, I can only restate that this is a blast, and I really wish I would have done it long ago. It is incredibly inspiring and rewarding to be among such passionate staff and students.


Wednesday, January 9, 2013

[School] Some quick pics

Class continues apace as we learn more about the nature and structure of wood, how to use chairmaking tools (such as travishers, spokeshaves, and drawknives), while continuing to learn about the students and instructors. Today was fast-paced and much was accomplished. Everyone's stool legs are fitted into the stool seats, and holes for the stretchers marked and drilled. Soon we will fit the stretchers, trim them all up, and the world will have 9 more stools than it did previously. Here is hoping that the moving box containing my camera is revealed soon! In the meantime, these are some photos taken by Tim Lawson. I should also point out that I learned today that there is still space left in Peter Follansbee's upcoming course, Make a Joint Stool From a Tree. This would be a killer opportunity to take a course in the beautiful Pacific Northwest with one of New England's most interesting traditional woodworkers.


Monday, January 7, 2013

[School] And So it Begins

Day one of the Foundation Course at the Port Townsend School of Woodworking. I'm tired. It was great. Here is a little more detail:

When I last posted, I was wondering about moving my tool chest. It all went well. I did get a little paranoid and stuffed some shop rags into the tills, and nailed them into place. It seems to have worked. My shop is now unloaded, but not unboxed. It will be some time until I have the new one up and running (the space needs some electrical work among other things), but that is no problem since I have access to the school's shop and frankly will have almost no time for anything at home for the duration of the course.

image courtesy of hyperkitten.com

Sadly I do not have a camera unpacked yet, but I hope to remedy that soon. So for this one you will have to use your imagination.

When we arrived at the school, a 30" diameter Douglas fir log was waiting for us in the yard. We rolled it around using peavies (long spikes with hinged jaws at the end), used a 2-man (or woman) saw to remove a sizable chunk of it which we then turned on end, and took turns driving wedges into it with sledges. This created some large "pizza slices" as they were called. We then used froes and mallets to divide these slices into smaller bits, almost but not really rectangular. The goal was to make legs and stretchers for stools.

We did have introductions and orientations first. It seems to be a great crew, diverse in ages and skill level. As Woodworking in America seemed almost exclusively attended by 55+ white males, it is refreshing to have a handful of women and rather young participants overall in this course. One of them is a bit famous (far outside of the woodworking world), but I will leave that a mystery for now.

Teamwork was instantly important as we swung heavy sledgehammers and mallets near each others heads and hands, and very important with the 2-person sawing operations. We then had some time to work with drawknives and spokeshaves at our benches, which also took some co-operation as the long legs reached out of our own personal workspaces and into the territory of those behind us.

We also did a bit od crosscutting of fir planks to create boards to make the stool seats from, and some nifty geometry via dividers to create the layout lines for the leg tenons and then used an enormous auger to drill the holes. This was a 2-person job since a crufe gauge was needed to drill at an angle to accommodate the splayed legs.

I am a bit surprised at how physically taxing it all was. I've been packing, loading, unloading, and unpacking for what seems like weeks now; carrying heavy furniture, loading all my tools into various containers, driving without rest, all while managing a small menagerie of animals and a little kid. I've felt so physically tired that I thought I was "in shape" but the class today was demanding! I cannot say the same of the bike commute. Although it has steep hills, it is nothing compared to the rides into town I was used to. I believe my jaunt this morning took about 7 minutes, the leisurely ride home perhaps twice that. At any rate, I will try to update regularly here with reports from the frontlines of the program, along with juicy photos of enthusiastic fledgeling woodworkers doing their thing in a paradisical setting, but for now I need to focus on a glass of wine courtesy of the supportive wife and try to get that kid into bed for some well-needed rest for all of us. More soon, and I daresay it will get good.

Friday, December 14, 2012

Moving a Tool Chest?

Soon, my entire collection of traditional woodworking tools will be moving about 380 miles north.


This is part of what tool chests were originally intended for; to protect tools during transit. However, I have been told by a trusted toolmonger to make sure I protect everything with plenty of bubblewrap and other padding. I certainly don't like the idea of edge tools rubbing around, but at the same time most of them are held in place pretty well by the design of the chest. I feel that wrapping the most fragile items, adding some filler to the tills, and then bracing the tills in place should be enough. I don't want to overdo it, nor do I want to ruin a bunch of valuable tools. Christopher Schwarz claims it is just fine for steel to rub on steel and doesn't worry. I worry.

If you've moved tools in a chest, I would love to hear your approach and your experiences.

I'm still trying to decide which of my lumber is worth moving. Too bad I do not have more local readers who would be interested in such stuff.

In other news, one of my patch designs has turned into the latest Lost Art Press tshirt. The whole thing is pretty silly (and intentionally so) but I am glad to be part of this esoteric world in some tiny way.

More soon as the new shop comes together and my classes begin!

Monday, December 10, 2012

[Review] Shopclass on Demand Streaming Videos


A large focus of this blog has been to explore the possibilities of learning woodworking alone. Fueled mostly by The Joiners Apprentice (which just today has been made available as an audiobook), I have also read many other books and viewed a number of videos.

Nothing changes the fact that woodworking must be learned by doing. A private lecture with the greatest woodworking instructor possible will still not get you there until you make the cuts on your own. A great teacher, however, will encourage, inspire and inform you, and videos can provide much of this. As one woodworking instructor told me, a main task of a teacher is to give the student permission to teach themselves.

And so, I was glad to review the Popular Woodworking service "Shop Class on Demand", which allows one to few hundreds of hours of content over the internet. This is essentiaally Netflix for woodworkers, and given the lack of woodworking content on Netflix, this is a great thing.

Full disclosure: I was given a 6-month media pass to review this service at no cost. I therefore cannot honestly assay the "value" as if the payment had come from my own wallet. I do believe I can effectively convey my impressions of the service, though.

Once an account is created, it is painless to load and view the videos. The audio and video quality are on par with any other major streaming service. My only technical complaint has been that if a video is paused for a length of time (say, overnight) it can be difficult to resume.

The videos themselves run a huge gamut from power tool techniques to several seasons of The Woodwrights Shop. Several (if not all) of Christopher Schwarz's videos are also available.

Many of the technique-based videos are the type which you may want to view over and over, perhaps even playing in your shop. In cases like this, you might want to actually own a copy of the content. This service, in that case, comes into usefulness as a way to preview these DVDs before commiting to purchase. You may opt to watch a single video for a few dollars before paying full price for the DVD.

If you plan to do a great deal of viewing, the unlimited plans make a lot of sense. With busy family and shop life, I do not have much time for viewing, but did stay up late a few times to get a sense of the type of material available through this service.

All in all, I give the service a thumbs up. I am not sure I agree with the pricing structure, but media is always a tricky game and as mentioned I did not actually pay for this service. Given my limited time for viewing, and limited interest in watching videos to begin with, I would say this service is not for me, but it very well might be for you. I would certainly love to have access to the several decades of The Woodwright's Shop, but no idea when I would get around to watching them.

I am grateful that Popular Woodworking is attempting to get with the times and explore modern media, and hope that this service is a success. Check it out here: Shop Class on Demand

Saturday, December 1, 2012

[Offtopic?] Where Wheels and Wood Collide

Beetles and Bikes. How do these relate to woodworking?

In Southeast Asian jungles, secretions from the lac beetle are harvested and rendered into the wonderous substance we call shellac. Durable, smooth, non-toxic, and attractive, it has long been the coating of choice for fine cabinetry and even fruit. Yep, you have most definitely eaten the stuff.

Sure, we all know shellac is a great finish for woodworking projects, but how does the amber-tinted stuff affect other materials, like say, cotton?

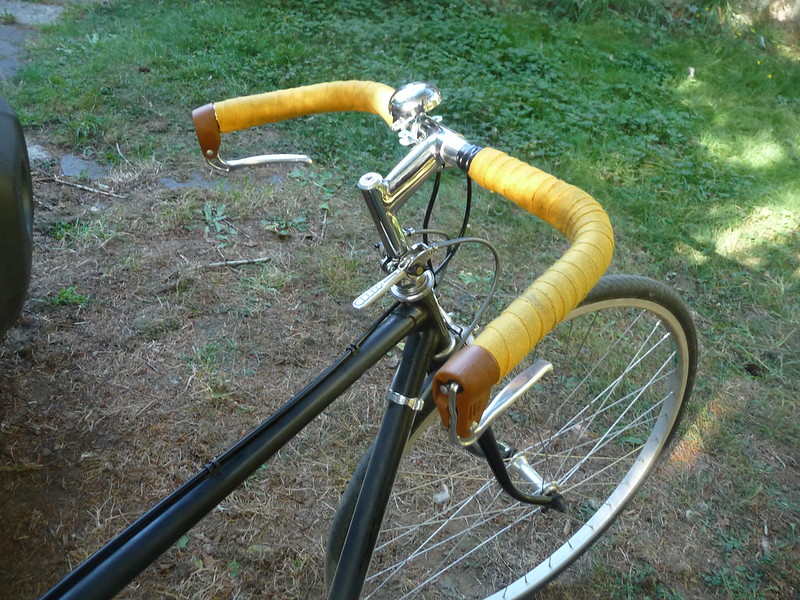
Here are my bike handlebars with a couple rolls of fresh yellow tape:


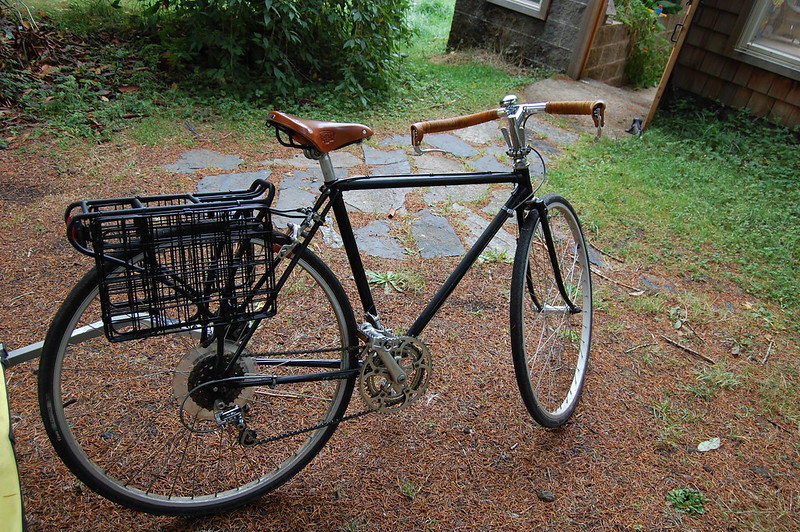
The cloth feels fine, but will rapidly stain and eventually fall apart with exposure to the elements. How about 3 coats of amber shellac?


It now almost looks like leather, no longer garish yellow. The feel is much better as well. The shellac fills in the pores in the coarse cotton cloth and leaves a smoother, more pleasant and just slightly tacky texture. It will now shed water, and resist rotting for decades, provided a new coat is applied here and there. The photographs do not show the change in texture much, but should convey the earthy, warm glow that results from this wonderful substance mixing with another organic material.

I've been impressed enough with this combination that I have applied it to another bike as well. This time, starting with a medium-obnoxious "grass green" which started like this:


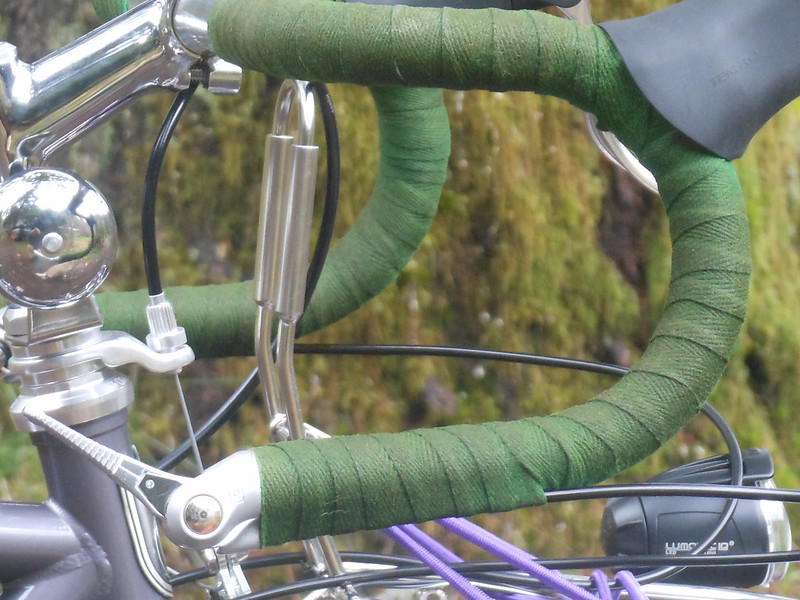
After 3 coats of amber shellac, we end up with a pleasant forest green. One more coat might turn it olive, and I might just do that. Here is the current result:


The texture is improved as before, and the loud color is muted just enough. It will continue to burnish and mellow with age, just like it does on wood. It makes me wonder what other materials shellac could improve. Twine-wrapped tool handles? Leather hinges? If you have used shellac in non-wood finishing contexts, I would love to hear about it.

Ok, so shellac is great, but why talk about bikes on a woodworking blog?

I could easily go into a rant about how traditional woodworking and utilitarian/sport-touring cycling are just two manifestations of the same ideals, but that would likely bore most of you, and if you get it, you already get it. Instead, I will get back to the topic at hand, and show some more shellac:


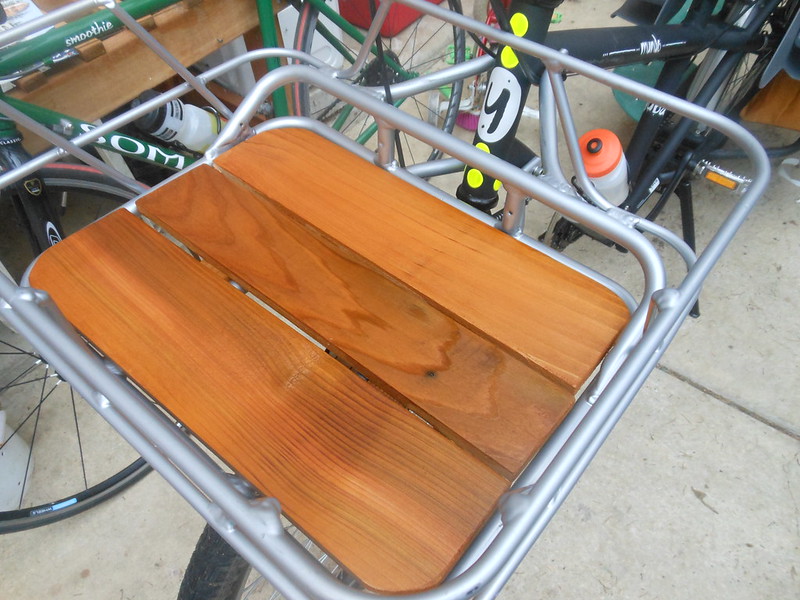
This insert for the bottom of a metal basket is made of old grey cedar fenceboards which I planed down substantially, shaped with a rasp, and nailed together using cross-battens on the bottom (which double as anchor points to secure the insert to the basket). Inserts like this are commercially available, and possibly a bit nicer than my one-afternoon job, but my cost was just time and a few grains of shellac. The wood is now durable, relatively rain-proof, and much more handsome than the naked rack or the raw grey cedar was.

Wine crates have been a common sight on French "porteur" style delivery bikes for many decades, but otherwise wooden luggage is not generally considered practical for bicycles. I consulted with Jan Heine of Compass Bicycles, generally regarded as the expert's expert on "Golden Age" bicycles, and he concurs that wooden luggage has never been popular. He speculates that aside from the weight, wood is too fragile in the event of an accident to warrant its use for anything more than casual riding. He is probably right.

I have it in mind to push the limits of absuridty, though, and eventually explore wooden trunk boxes as well as porteur front racks for city bikes. While indeed too heavy for extended trouing, it seems to me that thin, lightweight wood, a simple lock, and some sensible design could provide a useful bit of protection and organization for cargo while running errands (such as fetching coffee and bagels) around town.

In the meantime, though, thanks to all those lac beetles for giving us this precious goop!

Thursday, November 29, 2012

Join me in Joinery!


I've mentioned this before, but here it is again: I'll be in Port Townsend, WA this winter/spring for the Woodworking Foundation Course. While this should nicely complement my experience of working through the Joiner and Cabinet Maker, it is indeed pushing that chest of drawers project out a bit, but for a good reason. Being able to spend such a concentrated amount of time focusing on the craft and practice of woodworking is going to hugely benefit my mastery of the tools and techniques themselves. Additionally, I have been working 99% alone up to this point; having not only gifted instructors but other peers to work alongside is going to be a welcome change.

I've heard from Tim Lawson that there are still a couple spaces available in the course. So if you have wanted to dive head-first into the deep end of the pool, now is your chance! Enthusiastic Beginners are welcome but seasoned pros will also have much to learn. All tools are provided, so all you have to do is show up each day and pay attention. I am really looking forward to being able to spend some more time with Tim Lawson and Jim Tolpin, both of whom have worked quite hard to create this amazing school, and both of whom have personally been very helpful to me in my attempt to bootstrap my journey towards understanding traditional woodworking.

I'll be blogging my experience in the course as I can, although the more intense the course becomes, the less time and energy I may have for writing.

I am in the process now of packing up my shop and this is why there has not been much to post about woodworking itself on this blog recently. However, the blog is not going anywhere, and if the occasional silences bother you, I strongly suggest using a rss reader such as Google Reader, which allows you to "subscribe" to this blog and automatically receive the updates.

I hope to see some of you in the course, I am pretty stoked for it!